Key Takeaways
- Lighting is Credibility: Product photos with bad lighting signal low quality to customers, directly hurting conversion rates.
- AI is the New Studio: Tools like Lumabox.ai don't just "brighten" images; they fundamentally understand 3D geometry to relight products naturally.
- Fixing > Reshooting: You can salvage existing inventory photos with AI rather than organizing expensive reshoots.
- Consistency is King: AI ensures uniform lighting across your entire catalog, even if photos were taken in different environments.
- Intentionality: Learn to distinguish between "bad" shadows and dramatic, intentional lighting that adds value.
We've all been there. You have a fantastic product, you set it up on your table, snap a photo with your phone, and... it looks lackluster. Maybe it's too dark, maybe there's a harsh shadow from the window, or perhaps the colors look muddy and yellow.
In the world of e-commerce, lighting isn't just about visibility—it's about desire. A well-lit product looks premium, trustworthy, and worth the price. Conversely, bad lighting product photos can make even luxury items look like garage sale finds.
For years, the solution was either an expensive studio setup or hours of frustration in Photoshop. But in 2026, the game has changed. AI has democratized professional lighting, allowing anyone to transform a dimly lit garage shot into a studio-grade asset. Here is your comprehensive guide on how to fix bad lighting in a photo using the power of AI.
The High Cost of Bad Lighting
Before we fix the problem, we need to understand why it matters. In a brick-and-mortar store, customers can pick up an item, feel the material, and see it under store lights. Online, your photo is the only sensory input they have.
Why DIY Shots Often Fail
Most DIY entrepreneurs face the "Battle of the Bulbs." You might be mixing window light (cool blue) with your kitchen's overhead lights (warm yellow), resulting in weird color casts. Or perhaps you're using a direct flash, which creates harsh, unflattering hotspots and deep, distracting shadows.
The Impact on Sales
Product photos with bad lighting trigger subconscious red flags for shoppers:
- Lack of Trust: "If they didn't care enough to take a good photo, do they care about the product quality?"
- Unclear Details: Shadows can hide textures, buttons, or important features, leading to higher return rates when the product doesn't match the customer's mental image.
- Perceived Value: Dark, grainy images make products feel "cheap," forcing you to compete on price rather than quality.


Diagnosing "Bad" Lighting
Not all bad lighting is the same. To fix it, you first need to identify the specific issue.
- Underexposure: The image is simply too dark. Details are lost in the shadows, and the product looks dull.
- Harsh Shadows: Caused by a small, direct light source (like a phone flash or direct sun). These create hard edges that distract from the product's shape.
- Color Casts: White backgrounds look yellow or blue because of mixed lighting temperatures.
- Uneven Lighting: One side of the product is blown out (too bright), while the other is invisible.
- Further Reading: Want to understand the basics of capturing better source material? Check out our guide: How to Capture and Enhance Professional E-commerce Product Photos.
The Old Way vs. The AI Way
The Traditional Fix (The Hard Way)
Historically, learning how to fix bad lighting in a photo meant mastering manual editing tools:
- Curves & Levels: Adjusting histograms to brighten the image without washing it out.
- Dodge & Burn: Manually painting over specific areas to lighten shadows or darken highlights.
- Frequency Separation: A complex technique to smooth out skin or surfaces without losing texture.
This process takes 15–30 minutes per photo and requires a trained eye.
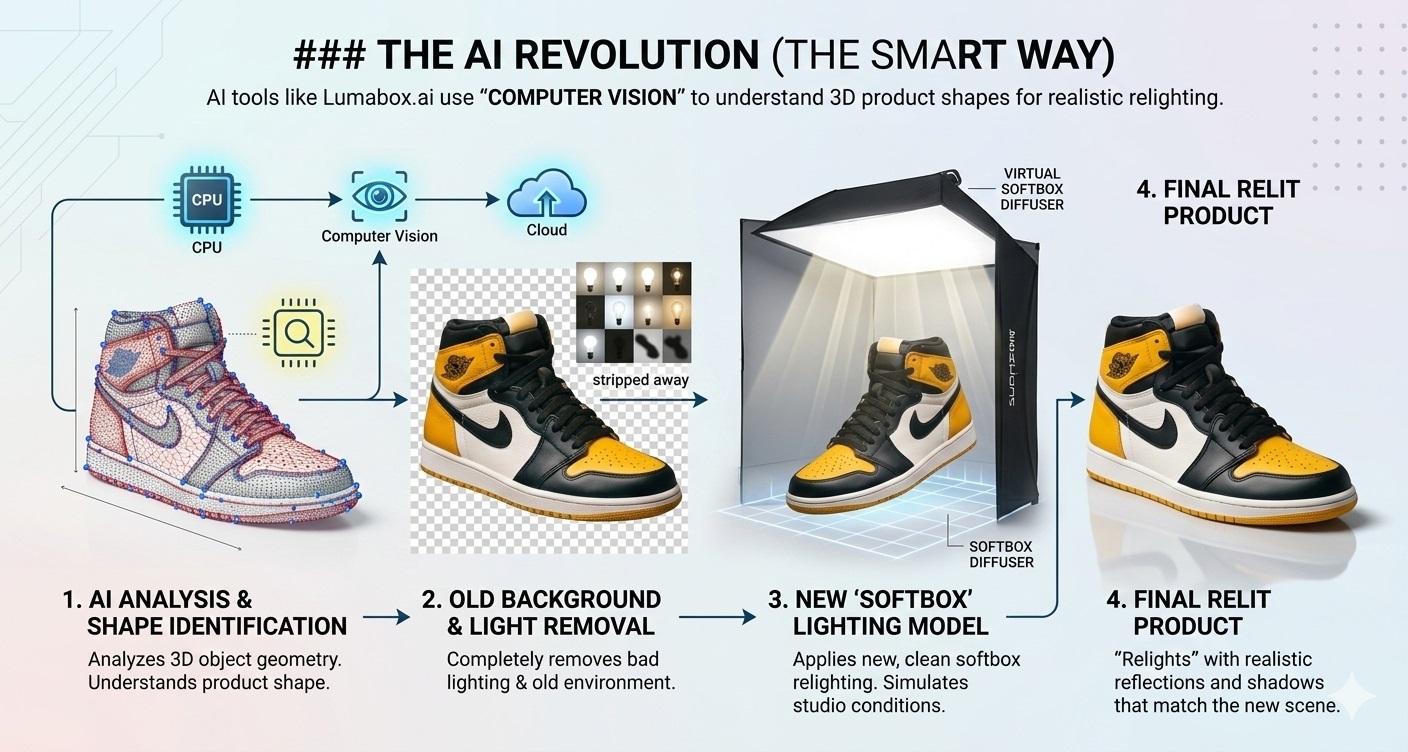
The AI Revolution (The Smart Way)
AI tools like Lumabox.ai don't just apply a brightness filter. They use "Computer Vision" to understand the 3D shape of your object. The AI separates the subject from the lighting environment, allowing it to:
- Strip away the bad lighting completely.
- Place the product in a new, virtual environment.
- "Relight" the product based on that new environment, generating realistic reflections and shadows that match the new scene.
How to Fix Bad Lighting in a Photo with Lumabox.ai
Ready to rescue your photos? Here is the step-by-step workflow to turn a dark, amateur shot into a professional asset.
Step 1: Upload Your "Imperfect" Photo
Don't worry if the background is messy or the light is uneven. Lumabox is designed to handle raw, imperfect inputs.
- Tip: Ensure the product is in focus. AI can fix lighting, but it can't fix a blurry photo (yet).
Step 2: Select Your Scene & Atmosphere
Instead of manually dragging "Exposure" sliders, you simply select a template and tell the AI the vibe you want. There are 9 series of templates you can choose from. For example,
- Studio & Packshot: For pure white background Amazon/Shopify listings. This automatically neutralizes color casts and applies even, flat lighting.
- Room Corners: Place your product on a "Sunny Kitchen Counter" or a "Wooden Table at Sunset." The AI will not only generate the background but also cast the appropriate warm or cool light onto your product to make it sit naturally in the scene.
- Category Anchors: Place your product on proper place according to it's specific scene of usage like "Skincare", "Shower", "Coffee", "Dining", "Fitness", "Baby", "Tech Desk", etc. The AI will put the subject into the selected scene with the appropriate warm or cool light onto your product.

Step 3: Refine and Edit
Once the AI generates the image, you can fine-tune the results.
-
Shadow Softness: Adjust how hard or soft the shadows are.
-
Light Direction: Move the virtual "sun" to highlight your product's best features (e.g., highlighting the texture of a leather bag).
-
Upscale: Use AI upscaling to remove the graininess often caused by shooting in low light.
-
Deep Dive: For more advanced techniques on polishing your final images, read our Professional Product Photo Editing Guide.
When Shadows Are Actually Good (Dramatic Lighting)
It's important to note that not all shadows are bad. In fact, removing every shadow can make a product look fake or "floating."
Bad Shadows: Unintentional, harsh, distracting, hiding details. Good Shadows: Intentional, directional, adding depth and drama.
For luxury items like whiskey bottles, watches, or jewelry, a "moody" lighting setup with deep shadows can actually increase perceived value. This is often done using black backgrounds and "rim lighting."
- Expert Tip: Learn how to harness the power of dramatic shadows in our article: Black Background Product Photography.


Tips for Better Inputs (Helping the AI Help You)
While AI is magic, it follows the "Garbage In, Better Out" rule. To get truly stunning results, try to give the AI the best possible starting point:
- Wipe Your Lens: A smudged phone lens creates a "hazy" look that confuses AI.
- Turn Off the Flash: Use continuous light (like a lamp) or natural window light instead.
- Use a Diffuser: Put a thin white sheet between the light source and your product to soften the shadows before you shoot.
Conclusion
You no longer need a five-figure budget or a degree in photography to have world-class visuals. By understanding how to fix bad lighting in a photo with AI, you level the playing field.
Product photos with bad lighting are a solvable problem. Whether you are dropshipping from your living room or managing a growing e-commerce brand, tools like Lumabox.ai allow you to consistently present your products in their best light—literally.
Don't let the shadows hide your sales potential. Step into the light.