

Key Takeaways
- First Impressions Matter: Professional ecommerce product photo editing is the backbone of high conversion rates and brand trust.
- Master the Basics: Understanding exactly how to edit product photo assets—from removing backgrounds to balancing colors—ensures visual consistency across your store.
- Embrace AI Workflows: Tools like LumaBox AI dramatically reduce editing time, using advanced features like AutoPrompt to generate perfect lighting and scenery in seconds.
- Boost Sales: Well-edited images reduce return rates and increase customer confidence.
The Ultimate Guide to Ecommerce Product Photo Editing


In the competitive world of online retail, your visuals are your storefront. When a customer lands on your page, they cannot touch or feel your product; they rely entirely on your imagery to make a purchasing decision. This is why mastering ecommerce product photo editing is no longer optional—it is a critical driver of sales and customer trust.
If you have ever wondered how to edit product photo assets to make them look like they belong in a high-end magazine, you are in the right place. In this comprehensive guide, we will break down the exact steps to transform your raw images into stunning, conversion-optimized visuals. We will also explore how modern AI solutions are revolutionizing the traditional editing workflow, making it faster and more accessible than ever before.
Why High-Quality Editing is the Backbone of E-commerce
Before diving into the technical steps, it is important to understand the "why" behind the process. Unedited or poorly edited photos can make even the highest-quality product look cheap.
- Increases Conversion Rates: Crisp, clear, and well-lit photos draw the eye and encourage users to click "Add to Cart."
- Builds Brand Trust: Consistency in your product catalog signals professionalism and reliability.
- Reduces Returns: Accurate color representation and detailed visuals ensure customers know exactly what they are buying, minimizing post-purchase disappointment.
How to Edit Product Photo: A Step-by-Step Guide
Whether you are using traditional software or next-generation tools, the core principles of professional product editing remain the same. Here is your step-by-step roadmap. For a deeper dive into capturing the initial shot, you can refer to our guide on how to capture and enhance professional ecommerce product photos.
Step 1: Background Removal and Cleaning
The first step in any product edit is isolating the subject. Cluttered backgrounds distract the buyer from the item you are trying to sell. Most e-commerce platforms, including Amazon and Shopify, recommend or require a pure white background for primary listings.
Remove any dust, scratches, or smudges from the product itself. A spotless product conveys quality and attention to detail.


Step 2: Color Correction and White Balance
Have you ever photographed a white shirt only for it to look yellow or blue? That is a white balance issue. Accurate color representation is crucial for reducing return rates. Adjust your temperature and tint so the colors in the photo match the real-life product perfectly. Enhance the vibrancy slightly to make the product pop, but avoid oversaturation, which can look artificial.


Step 3: Fixing Bad Lighting and Managing Shadows
Lighting can make or break an image. Even with a good studio setup, you may end up with harsh shadows or blown-out highlights. Adjusting the exposure, bringing up the shadows, and toning down the highlights will reveal the texture and details of your product.
If your original shots suffered from poor studio conditions, do not panic. You can learn more about how to rescue these images in our guide on how to fix bad lighting in product photos with AI.
Adding a subtle, realistic drop shadow or reflection beneath the product can also ground it, preventing it from looking like it is floating in empty space.


Step 4: Cropping and Alignment for Consistency
Consistency is key when a customer is scrolling through your category pages. Ensure every product is centered and occupies the same percentage of the frame. Use a consistent aspect ratio (typically 1:1 or 4:5 for most e-commerce platforms) and keep the margins uniform across your entire catalog.
Elevating Your Workflow with LumaBox AI
While the steps above are foundational, performing them manually on hundreds of products is incredibly time-consuming. This is where AI integration changes the game.
LumaBox AI takes the tedious manual labor out of the equation. Instead of spending hours masking backgrounds and tweaking exposure curves, you can automate the heavy lifting. LumaBox AI intelligently identifies the product, removes the background with pixel-perfect precision, and allows you to place your item in stunning, hyper-realistic AI-generated environments.
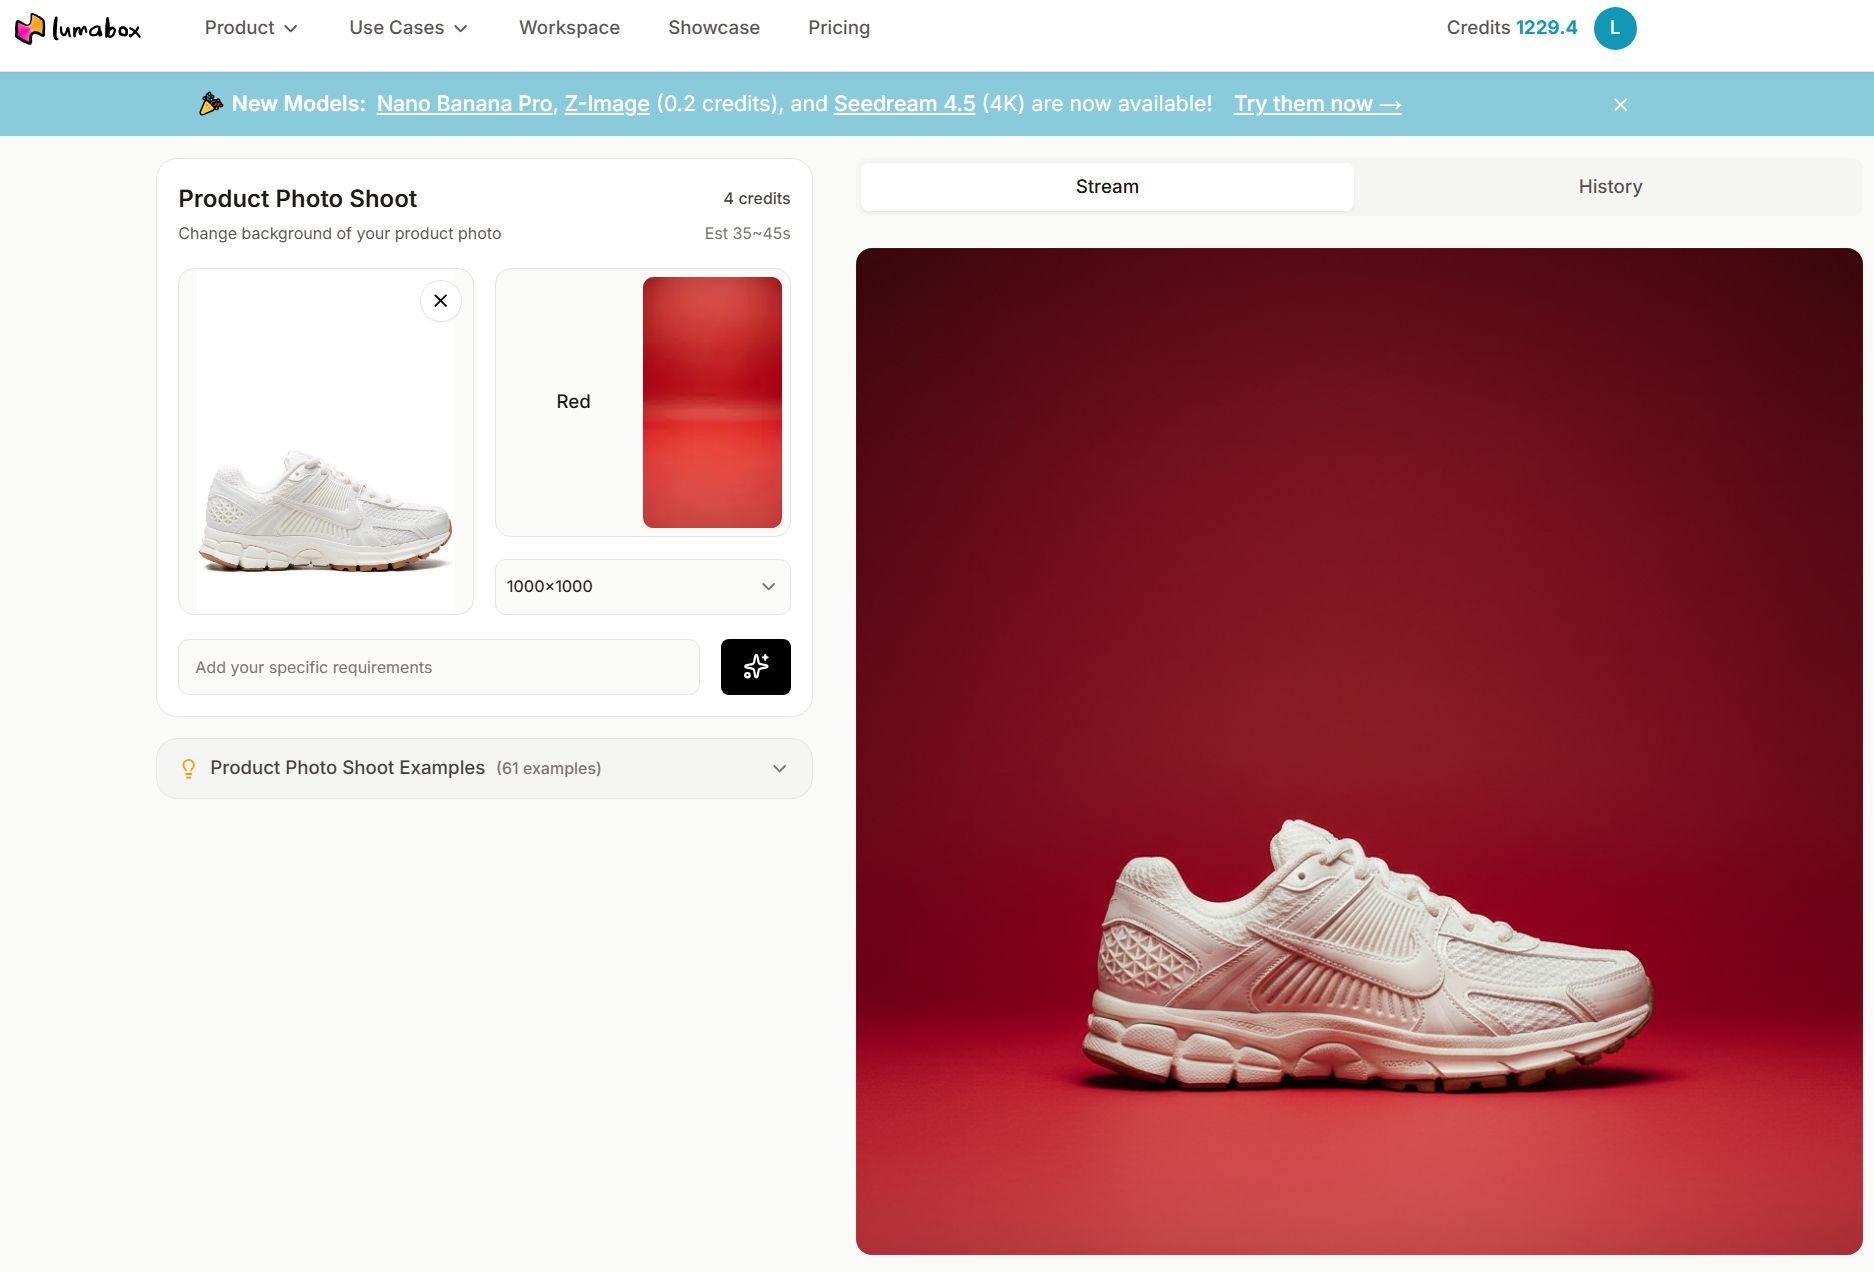
One of the standout features that elevates this process is AutoPrompt. If you struggle with coming up with the right descriptive words to generate a background, AutoPrompt analyzes your product and automatically crafts the perfect prompt to create a complementary scene. Curious about how this works? Check out our deep dive into what is AutoPrompt.
By integrating these AI capabilities, you not only speed up your workflow but also achieve a level of creative flexibility that traditional professional product photo editing methods simply cannot match.
Conclusion
Mastering ecommerce product photo editing is a powerful way to elevate your brand, build customer trust, and ultimately boost your sales. By understanding exactly how to edit product photos—focusing on clean backgrounds, accurate colors, and proper lighting—you set your store up for lasting success.
Do not let the technicalities slow you down. We encourage you to experiment with these techniques and embrace the power of AI to streamline your workflow. With tools like LumaBox AI, creating scroll-stopping, professional-grade imagery is just a few clicks away.
Related Articles
Want to dive deeper into optimizing your e-commerce visuals? Explore these related resources from our blog: